


The Friedman Archives Newsletter
November 2009


In this issue:
Outdoor Lighting for Group Portraits
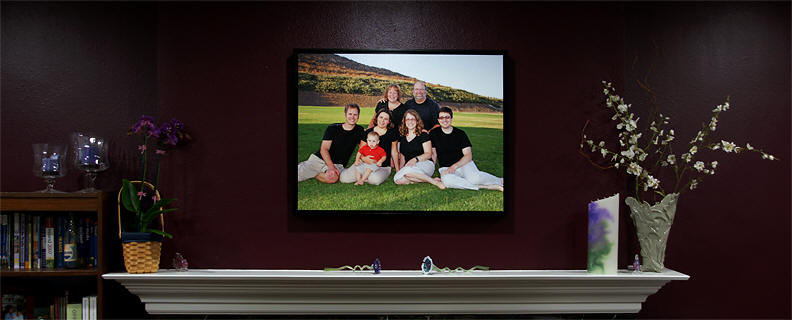
Have a look at the classic family portrait below.
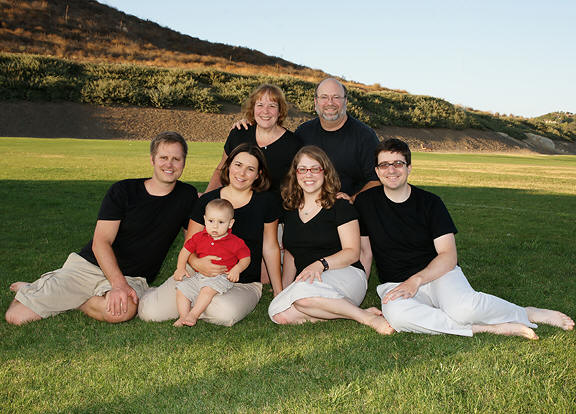
Easy shot, right? Just put the camera on a tripod and press the shutter release button, right? Nope. This portrait has a classic look to it, achieved using an unintuitive lighting technique that wedding photographers use every day. Have a look at the ground where the people are. That's right, they're in the shade! It's a bright, sunny day, but group portraits should always be taken in the shade. Why? Because harsh sunlight wreaks havoc on people's faces. Strong, directional sunlight casts unflattering shadows under the eyes and below the nose, and worse, it often makes people squint.
So what's the trick? It's kind of deceptive, but it works very well. You can still be outdoors, but put your subjects in the shade and illuminate them with your own, controlled light. It could be a powerful diffused flash using an umbrella, or (as in the case of the top picture), a 58 flash mounted on top of the camera. That's it! And technically the shot was easy to set up: The camera was set to Aperture Priority mode (f/8), and the flash was automatic. Way easier than in the old days!
For those of you who still shoot film, here is the technique I used to use when shooting weddings with film to achieve this classic look (it's quite unobvious but the looks are unmistakably professional): Set your camera to Manual exposure and set the f/stop to f/5.6. Set your Flash Exposure Compensation to -1, and take your handheld light meter and meter OFF THE GROUND. You're essentially measuring for the light in the shadows. Set your camera's shutter speed to let in one stop more light than what the light meter was recommending at f/5.6. The idea is to overexpose the background (usually lush greenery); and remove any obvious evidence of a flash. Of course this only works when shooting negatives (which are already being downrated from ISO 160 to 100) which, unlike digital cameras, can handle overexposure. When custom printed to compensate for the overexposure, the results look quite nice!
For most people this kind of lighting technique is a subconscious thing - they sense that the pictures have a certain professional "look" to them, but they can't quite articulate why. You don't appreciate how important natural-looking light is until you see it done poorly (like that wedding shot above :-) ). Now you know the secret - daylight is eschewed in favor of controlled light, and is done in a way that fools the viewer into thinking it's all natural. (Look at the shadows on the ground for proof that an off-camera flash was used.)
Back to the first shot for a second. There are other elements besides good light that go into a clean portrait. Posing is one, and there are entire books devoted to the subject of "perfect, classic poses". Here the formation of people is in the shape of a pyramid. Having everyone dressing similarly, wearing understated, non-distracting clothing is important too, so that your eyes go directly to the faces and nowhere else. Clearly that rule was violated for the baby (who didn't have a black shirt, and so the mother improvised), and in this particular case it was appropriate because the baby gets all the attention anyway.
Replacing Faces
Below is another group shot, also taken outdoors, also with the group in the shade. This time because the group was larger I used two wireless flashes; one on either side of the camera. The same formula was used: Aperture priority at f/8 and let the flashes do their thing on auto. But look at the two kids in the lower-left-hand-corner!! They're looking at someone else (probably a relative holding a point-and-shoot).
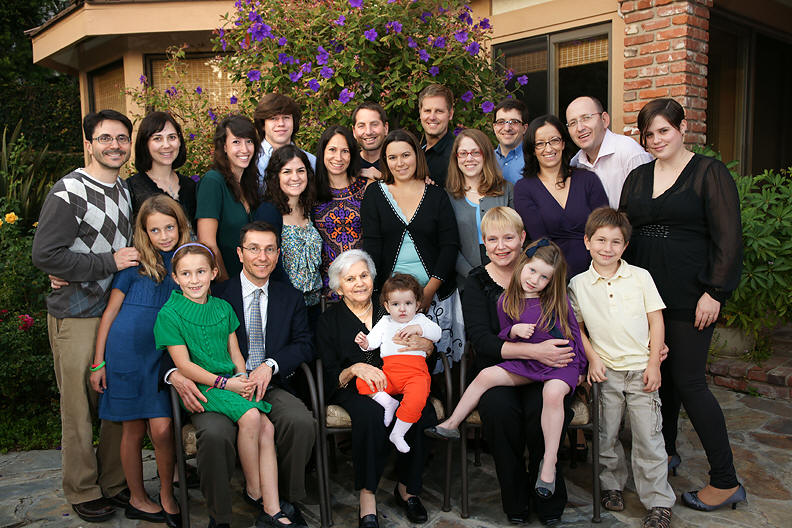
In the olden days photographers would take many shots of a group in hopes of getting just one shot where everyone looked good. Now they still take several shots, but this time hoping to catch one shot of each person looking good. Once you have that you can take the best of each face and merge everything in Photoshop. BUT, this is not just a matter of copying and pasting heads from one photo to another -- that is far too arduous a task. It turns out all you really need to copy are the eyes, nose, and mouth.
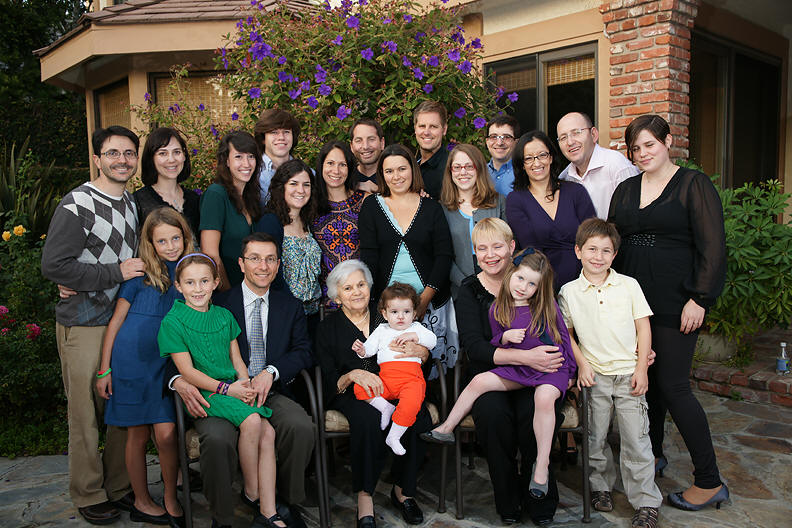
Below is another picture with the two children in question looking better:
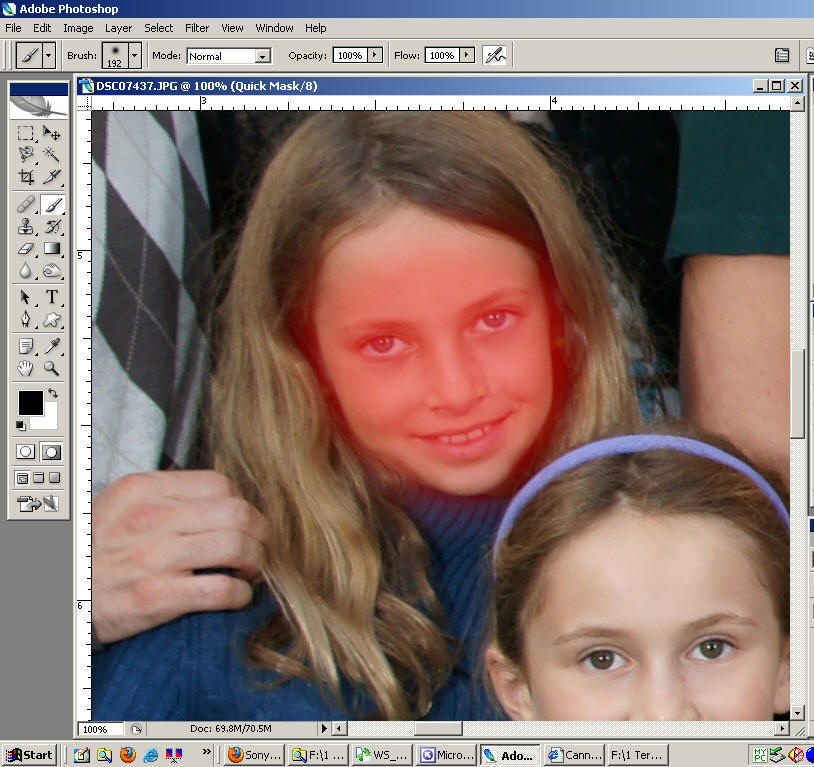
Photoshop has a "quick mask" tool where you can paint the parts you want to select. (Other photo editing programs offer similar features... regretfully this newsletter can't possibly be a tutorial on Photoshop.) In use, you select the Quick Mask tool (red circle in the screen grab below) and "paint" just the parts of the image you want to lift from the image:
![]()
Then do a SELECT --> INVERSE and copy what you have onto the other image. Below is a glimpse of the face essentials you're copying over:

Paste the new face onto the old one. If the head hasn't moved much, this will become a very easy face transplant. I did this with the two girls and the results are below:

Ain't Photoshop wonderful?
Having recently finished the book on the A330 / A380 and spending considerable time with the A550 right now, I've been living with some of the user interface design choices that the engineers have made. I'm talking specifically about button placement. Sony's entry-level models have been derided due to very poor placement of buttons. If you're used to the excellent ergonomics of the Minolta 7D, or the Sony A700 and higher, where buttons were placed where your fingers naturally fall to enable you to work very quickly, you will almost certainly pick up the entry-level cameras and notice that the controls are not conveniently placed at all. (This happens when high-end Canon users pick up their low-end cameras as well.) What were they thinking?
Well, believe it or not, this was done on purpose. Not to make the camera less usable, but to satisfy the needs of the entry-level DSLR buyer. Most such buyers are used to point-and-shoots, have little knowledge of the basics of photography, and buy a DSLR with the vague goal of "taking better pictures". Studies show that most of these folks never take the camera out of AUTO mode. They also find the large number of features on their camera intimidating, and should they happen to press a button accidentally (as they do in focus groups), they usually panic and get flustered because they don't know what they did and they certainly don't know what to do to un-do it. (And if they're in a focus group, they leave in a huff.)
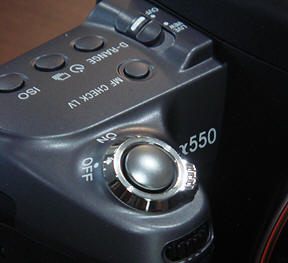
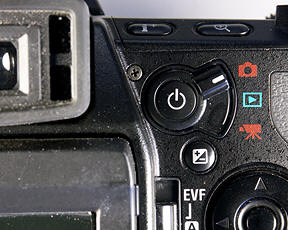
What's a camera designer to do? The answer: Place the buttons so that they're NOT easy to press accidentally. That usually means putting them away from where your fingers naturally fall. That front control wheel needs to be out of the way as well, which explains why it's placed where it is on the A330, A380, 500, and 550. You may find many people whining about button placement on some internet discussion forums, but the cameras are not aimed at this demographic.
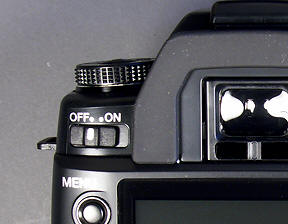
Now, about the on-off switch placement... Minolta could never figure out where to put an on-off switch:

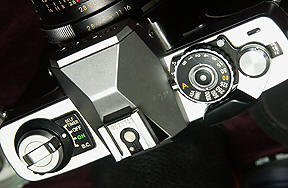
SRT-101 (That's right - it's on the camera's BOTTOM! Worst design ever.) |
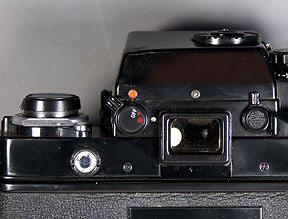
XK - next to the eyepiece |
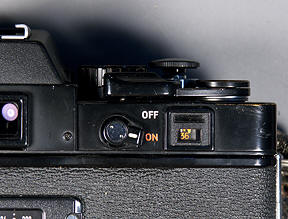
XE-7 - by the right thumb |
XG-7 - by the film rewind knob |
A1 / A2 - by the right thumb |
7D and later - to the left of the viewfinder, where nobody's fingers naturally fall |
|
Sony A230 and later - next to the shutter release button |
I've used them all, and I, like many others, have a strong opinion about what works best for me. My favorites were anything that allows me to turn the camera on while holding it in one hand - this means the XE-7, A1/A2, and the new A330/380 and A500/550. Sony's (and Minolta's) previous placement of the switch to the left of the viewfinder was just inconvenient and did slow me down a negligible amount on occasion. I really like the new on-off switch placement.
Seminar Updates
We're actively planning our travel schedule for 2010 Friedman Archives High-Impact Photography Seminars. Here's how things are shaping up:
| San Diego, CA | February 20-21, 2010 | Sign up! |
| Copenhagen | March 20-21, 2010 | |
| Amsterdam (Technically it's Utrecht) | March 27-28, 2010 | Click here to register interest |
| Orlando, FL | July 10-11, 2010 | Click here to register interest |
| Truro, Nova Scotia | August 14-15, 2010 | Sign up! |
| An outdoor workshop in Yarmouth, Nova Scotia | August 21-22, 2010 | Click here to register interest |
| Albuquerque, NM | September / October | Click here to register interest |
There may be one or two more toward the end of the year. The weekend in Copenhagen is being hosted by LOFSKOLENS University, and they will be handling the details of enrollment. (They have also asked me to lecture an additional evening about some of my NASA experiences with the Voyager and Galileo spacecraft, which I will happily do.) Regretfully due to other obligations we had to postpone some destinations (specifically the UK and Toronto) until 2011. (Although Truro isn't too far from Toronto...)
What are the Friedman Archives Seminars, you ask? Let's just say that they're so popular that they will be returning to Nova Scotia next year by local demand! (Okay, that's a conceited answer. Check out this page which gives you all the details.)
A230, 330, 380 Firmware Updates Available
 Who says Sony never listens to user feedback? When I
was writing the book for the
A330/A380 (which is now out, by the way!), I was a little taken
aback by the lack of an AEL button, which means no testing of the
wireless flash communication, and more important, no way of locking
the exposure when using Spot metering mode. (This means spot
metering could only be used when your subject was in the
very center of the frame like the image to the right - the very
antithesis of the rule-of-thirds way of life.)
Who says Sony never listens to user feedback? When I
was writing the book for the
A330/A380 (which is now out, by the way!), I was a little taken
aback by the lack of an AEL button, which means no testing of the
wireless flash communication, and more important, no way of locking
the exposure when using Spot metering mode. (This means spot
metering could only be used when your subject was in the
very center of the frame like the image to the right - the very
antithesis of the rule-of-thirds way of life.)
Sony has addressed this design deficiency by releasing a new firmware update for the A230, A330, and A380 cameras. What does it do? It locks the exposure at the same time the camera locks focus, whether you're in Spot, Center-weighted, or multi-segment metering mode. That way you can free up your compositional creativity.
If you have a Mac, click here for instructions and the firmware upgrade. If you have a PC, click here.
Until next year...
This newsletter was a little on the long side because it will be my last one for the year. I've got some more travelling to do and then hope to finish the A550 book by the end of January. Wish me luck!
Yours Truly,
Gary Friedman
| Next Newsletter - December, 2009 | |
| Previous Newsletter - October, 2009 | Newsletters Main Page |
Back to the Friedman Archives Home page